- Source control refers to tracking and managing changes to code.
- This ensures that developers are always working on the right version of source code.
- Every development team needs a good way to manage changes and version code in their codebases
That’s why they use source control tools.
- Source control management (SCM) refers to tools that help you keep track of your code with a complete history of changes.
- Source code management tool (SCM) tracks changes to a source code repository.
- SCM also maintains a history of changes.
- This is used to resolve conflicts when merging updates from multiple developers.
Why Source Control Is Important?
- When multiple developers are working within a shared codebase it is a common occurrence to make edits to a shared piece of code.
- Separate developers may be working on a seemingly isolated feature, however this feature may use a shared code module.
- Therefore developer 1 working on Feature 1 could make some edits and find out later that Developer 2 working on Feature 2 has conflicting edits.
- Before the adoption of SCM this was a nightmare scenario.
- Developers would edit text files directly and move them around to remote locations using FTP or other protocols. Developer 1 would make edits and Developer 2 would unknowingly save over Developer 1’s work and wipe out the changes.
The benefits of source code management
- Collaborative code development a more user friendly experience.
- Historical record can then be used to ‘undo’ changes to the codebase.
- A clean and maintained SCM history log can be used interchangeably as release notes. This offers insight and transparency into the progress of a project that can be shared with end users or non-development teams.
- SCM will reduce a team’s communication overhead and increase release velocity.
- With SCM developers can work independently on separate branches of feature development, eventually merging them together.
- The most IMP benefit Is Version control.
- Version control is a system that records changes to a file or set of files over time so that you can recall specific versions later.
- It allows you to revert selected files back to a previous state, revert the entire project back to a previous state, compare changes over time, see who last modified something that might be causing a problem, who introduced an issue and when, and more.
- Using a VCS also generally means that if you screw things up or lose files, you can easily recover.
- Here version control is also called as source control its one and the same thing. SCM or VCM is one and the same.
Version control-
- Version control is a system that records changes to a file or set of files over time so that you can recall specific versions later.
- It allows you to revert selected files back to a previous state, revert the entire project back to a previous state, compare changes over time, see who last modified something that might be causing a problem, who introduced an issue and when, and more.
- Using a VCS also generally means that if you screw things up or lose files, you can easily recover.
- Here version control is also called as source control its one and the same thing. SCM or VCM is one and the same.
Types of Version control system (VCS)-
- Local VCS
- Centralized VCS
- Distributed VCS
Local VCS-
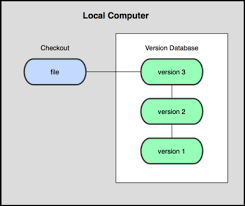
- Many people’s version-control method of choice is to copy files into another directory (perhaps a time-stamped directory, if they’re clever).
- This approach is very common because it is so simple, but it is also incredibly error prone. It is easy to forget which directory you’re in and accidentally write to the wrong file or copy over files you don’t mean to.
- To deal with this issue, programmers long ago developed local VCSs that had a simple database that kept all the changes to files under revision control.
- One of the most popular VCS tools was a system called RCS (Revision control system).(1982)
Centralized VCS-

- The next major issue that people encounter is that they need to collaborate with developers on other systems.
- To deal with this problem, Centralized Version Control Systems (CVCSs) were developed.
- These systems (such as CVS, Subversion, and Perforce) have a single server that contains all the versioned files, and a number of clients that check out files from that central place.
- For many years, this has been the standard for version control.
- This setup offers many advantages, especially over local VCSs. For example, everyone knows to a certain degree what everyone else on the project is doing.
- However, this setup also has some serious downsides. The most obvious is the single point of failure that the centralized server represents.
- If that server goes down for an hour, then during that hour nobody can collaborate at all or save versioned changes to anything they’re working on.
- If the hard disk the central database is on becomes corrupted, and proper backups haven’t been kept, you lose absolutely everything — the entire history of the project except whatever single snapshots people happen to have on their local machines.
Distributed Version control System-
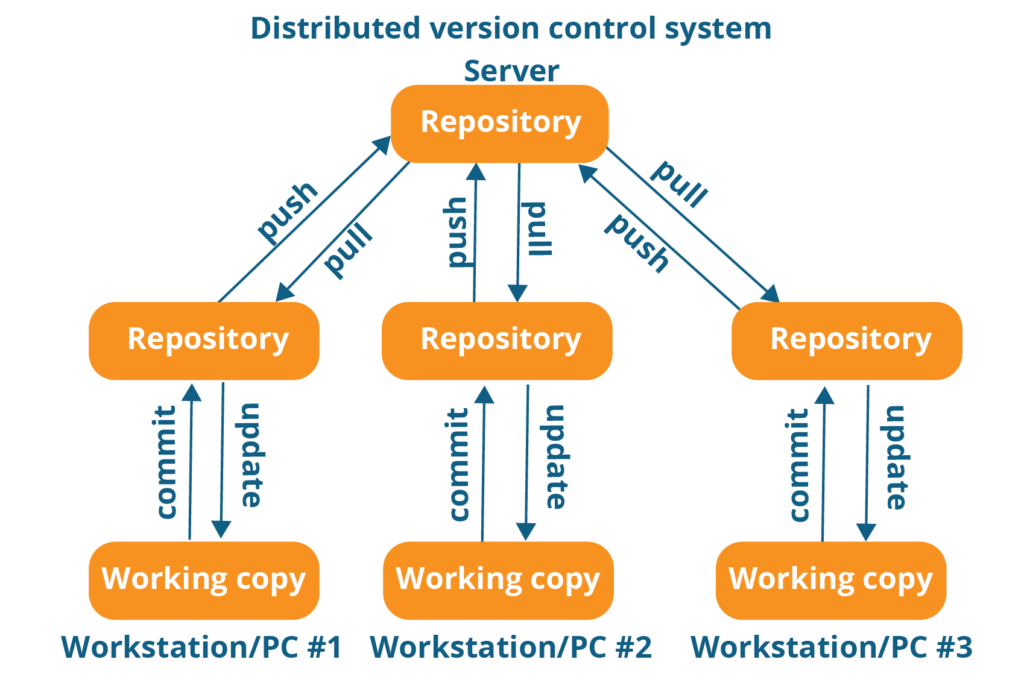
- This is where Distributed Version Control Systems (DVCSs) step in. In a DVCS clients don’t just check out the latest snapshot of the files; rather, they fully mirror the repository, including its full history.
- Thus, if any server dies, and these systems were collaborating via that server, any of the client repositories can be copied back up to the server to restore it.
- Every clone is really a full backup of all the data.
- DVCS system are working fine on offline mode as a client copies the entire repository on their local machine
- If DVCS server is down developer can work using their local copies
- Furthermore, many of these systems deal pretty well with having several remote repositories they can work with, so you can collaborate with different groups of people in different ways simultaneously within the same project.
GIT –
Stages of Git/ Workflow
- Workspaces/ Working directory
- Staging area
- Local Repo
Repository
- Repository is a place where you have all your code or kind of folder on server
- It is a kind of folder related to one product
- Changes are personal to that particular repository
Server
- It stores all repositories
- It contains metadata also
Working directory
- Where you see files physically and do modification
- At a time you can work on particular branch
- In another CVCS, developers generally makes modification and comet they are changes directly to the repository but Git uses or different strategy Git does not track each and every modified file whenever you do come it and operation Git Looks for the files present in the Staging area only those files present in the Staging area are considered for commit and not all the modified files.
- Working directory
- Staging area
- Local Repository
Commit-ID / Version-ID/ Version
- Reference to identify each change
- To identify Who changed the file
Tags
- Tax assign a meaningful name with a specific version in the repository once a tag is created for a particular save even if you create a new commit it will not be updated.
Snapshots
- Represent some data of particular time
- It is always incremental I.e. it stores the changes (appended data) only not entire copy
Commit
- Store changes in repository you will get one commit ID
- It is 40 alphanumeric characters
- It uses SHA-1 check sum concept
- Even if you change one dot comet ID will get change
- It actually helps you to track the changes
- Commit is also named as SHA1 hash
Push
- Push operations copies changes from a local repository instances to a remote or central Repo this is used to store the changes permanently into the GIT repository
Pull
- Full operation copies the changes from a remote repository to a local machine the pull operation is used for synchronisation between two Repo.
Branch
- Product is same so one repository but different track
- Each task has one separate branch
- Finally merge code all branches
- Useful when you want to work parallel
- Can create one branch on the basis of another branch
- Changes are personal to that particular branch
- Default branch is Master
- File created in work space will be visible in any of the branch workspace until you commit once you come it then that file belongs to the particular branch.
Advantages of Git
- Free and open source
- Fast and small as most of the operations are performed locally therefor it is fast
- Security git uses of common Cryptography has function called secure has function SHA1 to name add identify objects within its database
- No need of powerful hardware
- Easier branching if we create a new branch it will copy all the codes to the new branch
Types of Repositories
- Bare Repositories (Central Repo)
- Store and share only
- All Central repositories are Bare Repo
- Non-Bare Repositories (local repo)
- Where you can modify the files
- All local repositories are non-bare repositories
How to install git on EC2
# sudo su
# yum update-y
# yum install git -y
# git –version
# git config –global user name
# git config –global user email
How to Commit, push & pull from github
- Create one directory and go inside it
#git init
-Touch my file (put some data)
#git status
#git add .
#git commit -m “My first commit”
#git status
#git log
#git show <commit-id>
#git remote add origin <central git url>
#git push -u origin master(enter username & password)
To ignore some files while committing
- Create one hidden file.gate ignore and enter file format which you want to ignore
For eg. #vim .gitignore
Enter *.css
#git add .gitignore
#git commit -m “latest update exclude css”
#git status
- Create some text, Java and CSS files and add them by running “git add”
# ls
# git status
# git add .
# git status
# git commit -m “my text files only”

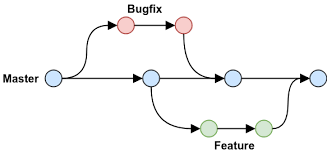
The diagram about visualize a repository with two isolated lines and development one for a little features and one for a longer running features by developing them is branches it’s not only possible to work on both of them in parallel but it also keeps the main master branch free from error.
Ex. Hotfix Branch
- Each task has one separate branch
- After done with code merge other branches with master
- This concepts is useful for parallel development
- You can create any number of branches
- Changes are personal to that particular branch
- Default branch is Master
- Files created in work space will be visible in any of the branch workspace until you come it once you come it then that files belongs to that particular branch
- When created new branch data of existing branch is copied to new branch
- To see list of available branches git branch
#git branch
- Create a new branch
#git branch <branch name>
- To switch branch
#git checkout <name of branch you want to change>
Merge
You can’t merge branches of different repositories
We use pulling mechanism to merge branches
#git merge <branch name>
- To verify the merge
#git log
- To push to central repo like github
#git push origin master
Git Conflict
When some file having different content in different branches if you do merge conflict occurs (resolve conflict then add and commit)Conflict occurs when you merge branches
Merge Strategies in Git-
Merge in Git allows you to join two or more development work created using git branch into a single branch
- Recursive-
$git merge -s recursive branch1 branch2
Git will select recursive as a default strategy when pulling or merging branches. The recursive strategy can detect and manage merges that involve renames, but it cannot use detected copies.
2. Resolve-
$git merge -s resolve branch1 branch2
The resolve strategy uses a 3-way merge for resolving branches and can resolve only two HEADs using a 3-way merge algorithm. It is safe and fast and detects criss-cross merge ambiguities in detail.
3. Octopus-
$git merge -s octopus branch1 branch2 branch3 branchN
When two or more branches are passed, the octopus strategy is engaged, by default. Octopus refuses if the merge has conflicts that need manual resolution. The basic use of Octopus is to bundle feature branch HEADs that have similarities.
4. Ours-
$git merge -s ours branch1 branch2 branchN
Our strategy resolves multiple branches, but the result is always that of the current branch HEAD. It ignores all changes from all other branches very effectively. It is intended to be used to replace an old history of side branches.
5. Subtree-
$git merge -s subtree branchA branchB
The subtree strategy is the modified version of the recursive strategy. For example, we merge A and B trees. When corresponding to a subtree of A, B is first modified to reflect the tree structure of A. The modification can be done to the shared ancestor tree of A and B.
Git Stashing
Suppose you are implementing a new feature for your product your code is in progress and suddenly a customer escalation comes because of this you have to keep a side you are a new feature work for new hour you cannot commit you are partial code and also cannot throw away you are changes so you need some temporary storage when you can store you are partial changes and later on commit it
To stash an item (only applies to modified files not new files)
- To stash an Item
#git stash
- To see stashed items list
#git stash list
- To apply stashed items
#git stash apply stash@{0}
Then you can add and commit
- To clear the stash items
#git stash clear
Git Reset
There are three different kinds of resets in Git, and they all differ based on how they handle the commits that get left hanging. They all rewrite Git history, and they all move the HEAD back, but they deal with the changes differently:
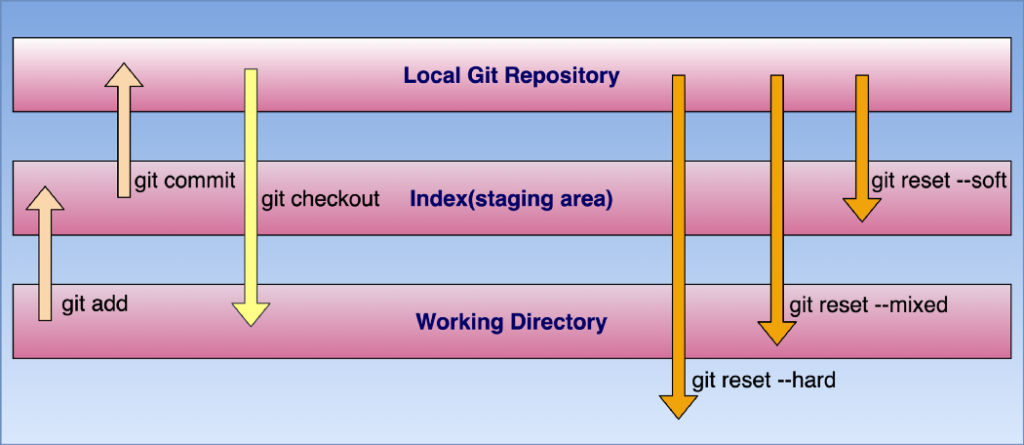
git reset –soft which will keep your files, and stage all changes back automatically.
#git reset –soft HEAD
git reset –hard which will completely destroy any changes and remove them from the local directory. Only use this if you know what you’re doing.
# git reset –hard HEAD
git reset –mixed which is the default, and keeps all files the same but unstages the changes. This is the most flexible option, but despite the name, it doesn’t modify files.
# git reset –mixed commit_id
The difference between soft and mixed is whether or not the changes are staged. Staged is basically an in-between zone between the local directory and Git history. git add stages files, and git commit writes them to the history. In either case, the local directory is unaffected, it just changes the state of Git’s tracking of those changes.
Git fork –
A fork is a rough copy of a repository. Forking a repository allows you to freely test and debug with changes without affecting the original project. One of the excessive use of forking is to propose changes for bug fixing.
Git clone vs. fork –
Any public Git repository can be forked or cloned. A fork creates a completely independent copy of Git repository. In contrast to a fork, a Git clone creates a linked copy that will continue to synchronize with the target repository.
Git fetch –
The git fetch command downloads commits, files, and refs from a remote repository into your local repo. Fetching is what you do when you want to see what everybody else has been working on. but it doesn’t force you to actually merge the changes into your repository.
# git fetch <remote>
Fetch all of the branches from the repository. This also downloads all of the required commits and files from the other repository.
# git fetch <remote> <branch>
Same as the above command, but only fetch the specified branch.
# git fetch –all
Git pull –
The git pull command is used to fetch and download content from a remote repository and immediately update the local repository to match that content.
# git pull <remote>
Git Fetch Vs Git pull
Git Fetch is the command that tells the local repository that there are changes available in the remote repository without bringing the changes into the local repository. Git Pull on the other hand brings the copy of the remote directory changes into the local repository.
Git Tag –
Git tag command, which allows you to label your commits (and other Git objects) by assigning them readable names that can be easily referenced when traversing the history of a Git repository.
$ git tag v1.0.0
$ git tag –list
Git Revert-
The git revert command can be considered an ‘undo’ type command, however, it is not a traditional undo operation. Instead of removing the commit from the project history, it figures out how to invert the changes introduced by the commit and appends a new commit with the resulting inverse content. This prevents Git from losing history, which is important for the integrity of your revision history and for reliable collaboration.
$ git revert HEAD
Git revert expects a commit ref was passed in and will not execute without one. Here we have passed in the HEAD ref. This will revert the latest commit. This is the same behaviour as if we reverted to commit.
Git Rebase –
Rebase is one of two Git utilities designed to integrate changes from one branch onto another. Rebasing is the process of combining or moving a sequence of commits on top of a new base commit. Git rebase is the linear process of merging.
A Git rebase changes the base of the developer’s branch from one commit to another, so it looks like they have created their branch from a different commit. Internally, Git creates a new commit and applies it to the specified base. However, it’s essential for everyone involved to understand that although the branch appears the same, it’s made up of entirely new commits. When you perform a Git rebase, you are, in effect, rewriting history.
Here’s how Git rebasing compares to Git merging. Let’s say you’re a developer who is working on a new feature on a dedicated branch. Then, another development team member updates the main branch with some new commits. The situation looks like this:

Eventually, however, the team concludes that the main’s new commits are relevant to the feature you are working on. So then, if you want to incorporate the new commits onto your branch, you can either do a merge or a rebase. If you decide to use Git merging, you tack on the new commits to your new branch like this:
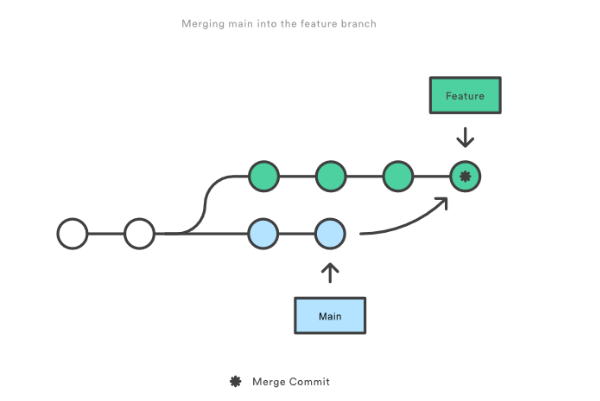
However, if you use Git rebase, you move your whole feature branch, starting it on the tip of the main branch so that all the new commits are now part of the whole. This action rewrites the project history by making new commits for each of the original branch’s commits. So, this is how the new branch looks:

First, you need to switch to the branch in question:
$ git checkout <branch name>
Then, just rebase to the master.
$ git rebase master
Git cherry-pick –
It is necessary in case of bug fixing because bugs are fixed and tested in the development branch with their commits. It is mostly used in undoing changes and restoring lost commits. You can avoid useless conflicts by using git cherry-pick instead of other options.
git cherry-pick is a powerful command that enables arbitrary Git commits to be picked by reference and appended to the current working HEAD. Cherry picking is the act of picking a commit from a branch and applying it to another. git cherry-pick can be useful for undoing changes.
In its most basic form, you only need to provide the SHA identifier of the commit you want to integrate into your current HEAD branch:
# git cherry-pick af02e0b
This way, the specified revision will directly be committed to your currently checked-out branch. If you would like to make some further modifications, you can also instruct Git to only add the commit’s changes to your Working Copy – without directly committing them:
# git cherry-pick af02e0b –no-commit
Git Hooks
Git hooks are scripts that run automatically every time a particular event occurs in a Git repository. They let you customize Git’s internal behavior and trigger customizable actions at key points in the development life cycle.
Major benefits of using Git hooks include encouraging a commit policy, automating development workflow, and implementing continuous integration.
There are two groups of Git hooks:
- client-side / local hooks, which are prompted by events on the local repository, such as when a developer commits or merges code.
- server-side / remote hooks, which are run on the network hosting the repository, and they are prompted by events such as receiving pushes.
Of the client-side hooks, the most commonly used ones are:
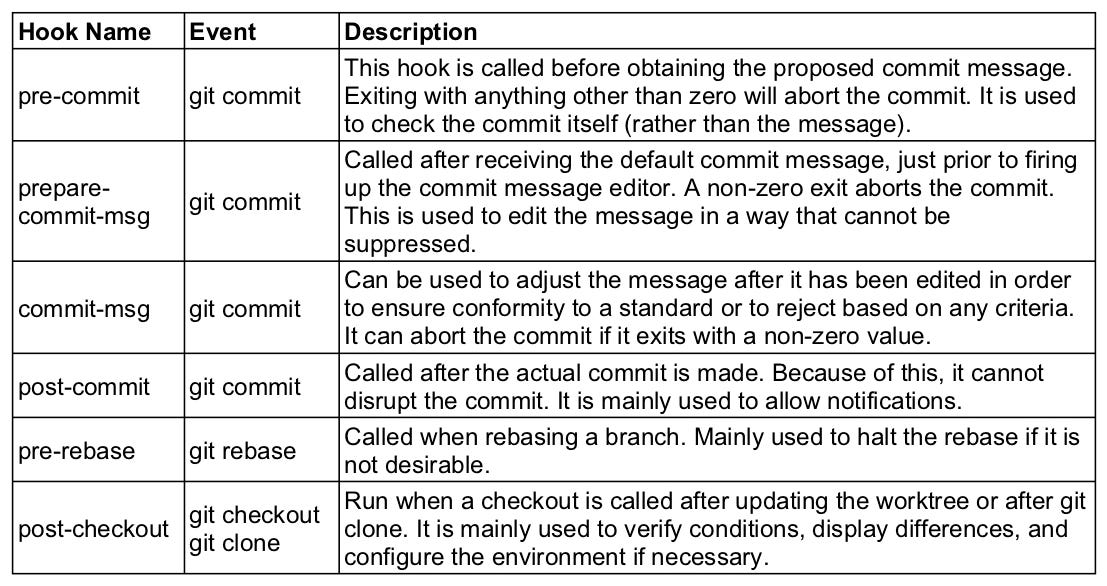
Some scripts take in one to three arguments, while others take none. Common use cases include checking the commit message for spelling errors, notifying (via email or text) team members of new commits, and implementing continuous integration workflows.
Sharing Git Hooks:
As mentioned above, client-side hooks are local to any given Git repository. This means they are not cloned with the rest of the project and are not version-controlled. As such, maintaining hooks for a team can be tricky.
One workaround is to store the hooks in the project directory, above the .git folder, which would allow the files to be included in the version-control flow. Then, each developer would just copy and paste the files into their local .git/hooks directory. Alternatively, your could create server-side hooks to reject commits that do not conform to certain standards.
Cheat Sheet
| Start a project | |
| $git init <directory> | Create a local repo to initialise the current directory as git repo |
| git clone <url> | Download a git repo |
| Make changes | |
| $git add <file> | Add a file to staging |
| $git add . | Stage all files |
| $git commit -m “commit message” | Commit all taged files to git with message |
| $git commit -am “commit message” | Add all changes made to tracked files & commit |
| Branches | |
| $git branch | List all local branches. |
| $git branch -a | List all branches |
| $git branch -r | List all remote branches |
| $git branch new-branch | Create new branch |
| $git checkout branch | Switch to a branch and update working directory |
| $git checkout -b new-branch | Create a new branch and switch to it |
| $git branch -d branch-name | Delete a merged branch |
| $git branch -d branch-name | Delete a branch whether merged or not |
| $git tag tag-name | Add a tag to current commit |
| Merging | |
| $git merge –squash a | Merge & squash all commits into one new commit |
| Rebasing | |
| $git rebase -i main | Interactively clean up a branch commit before rebasing into main |
| $git rebase -I Head-3 | Interactively rebase the last 3 commits on current branch |
| Undo things | |
| $git mv existing-path new-path | Move/Rename a file & stage move |
| $git rm file | Remove a file from working directory, staging area then stage the removal |
| $git rm –cached file-name | Remove from staging area only |
| $git checkout commit-id | View a previous commit (Read Only) |
| $git revert commit-id | Create a new commit, reverting the changes from a specified commit |
| $git reset commit-id | Go back to a previous commit & delete all commits & delete all commits ahead of it |
| Stashing | |
| $git stash | Store modified and staged changes |
| $git stash save “comment” | Store modified and staged changes with comment |
| $git stash -p | Partial stash. Stash just a single file, a collection of files or individual changes from within files |
| $git stash list | List all stashes |
| $git stash apply | Re-apply stash without deleting it |
| Synchronising | |
| $git remote add alias url | Add a remote repo |
| $git remote | View all remote connections |
| $git remote rename old new | Rename a connection |
| $git fetch alias | Fetch all branches from remote repo |
| $git pull | Fetch the remote repo’s copy and then merge |
| $git push alias | Upload local content to remote repo |
