Large organizations depend on Windows Active Directory (AD) to maintain order in the chaos that is managing users, computers, permissions, and file servers.
What is Active Directory?
Active Directory is a Microsoft product that operates on Windows Server. It is a database and set of services developed to help you with access, management, and permissions for your network resources. The organizational data is stored as an object in the Active Directory, and it can be in the form of devices, files, users, applications, groups, or shared folders. In addition, these objects can be categorized by their name or attribute.
The directory or database stores critical information related to your IT environment, including essential details about users, user permissions, and computers. In short, it helps you control various activities going on in your IT environment. Most importantly, AD also ensures user authentication, generally via user ID and passwords, and allows them to access data they’re authorized to use.
How does Active Directory work?
In the AD, the domain is the primary unit in a logical structure. The objects named under the same directory database, trust relationships, and security policies with other domains are called Domains. Each domain will store data about objects belonging to that domain only.
Settings and security policies, for example, Access Control Lists (ACLs), admin rights, etc., do not pass from one domain to another. In short, the admin can set policies only for the domain they belong to. Domains allow admins to set boundaries for objects and handle security policies for shared network resources.
One of the primary Active Directory services is the AD DS (Active Directory Domain Services), a crucial part of the Windows Server OS. The AD DS runs on servers known as Domain Controllers (DCs). An enterprise usually has multiple DCs, and each of these controllers has a copy of the main directory for the domain. Any changes made to the directory on one DC- for example, deleting a user account or changing a password are all applied to the other DCs in a domain to keep them up-to-date.
Why is Active Directory So Important?
To simplify and understand the concept of AD better, consider Active Directory as the “Contacts” application on your mobile phone. The Contacts app itself acts as an Active Directory, while individual contacts in the app would be its “objects”. The values stored in each object, such as phone number, address, email, etc., would be your Active Directory. The only difference is that objects like in the mobile app aren’t just limited to people, but AD may also contain group objects such as printers, computers, devices, etc.
Active Directory is vital for organizations as it helps you efficiently manage company users, computers, devices, and applications. For example, IT managers can leverage Active Directory to systematically organize company data in a hierarchy structure, which states which users or computers belong to which network, or which users have access to which network resources, and so forth.
How to Setup Active Directory Domain Controller?
A domain controller contains many computers on the network and allows the system administrators to manage them from the central place. It is a server or computer used to authenticate other computers throughout the network. It stores the login credentials of all other computers and printers in the network.
This section will show you how to install Active Directory Domain Services and set up a domain controller on Windows server 2019.
Follow the below steps to install Active Directory Domain Services:
Step 1 – Login to Windows server 2019 as an administrator and open the Server Manager as shown below:

Step 2 – Click on the Add Roles and Features. This will open the Add Roles and Features Wizard as shown below:

Step 3 – Click on the Next button. You will be asked to select the installation type as shown below:

Step 4 – Select Add Roles and Features Wizard and click on the Next button. Next, you will be asked to select a destination server as shown below:
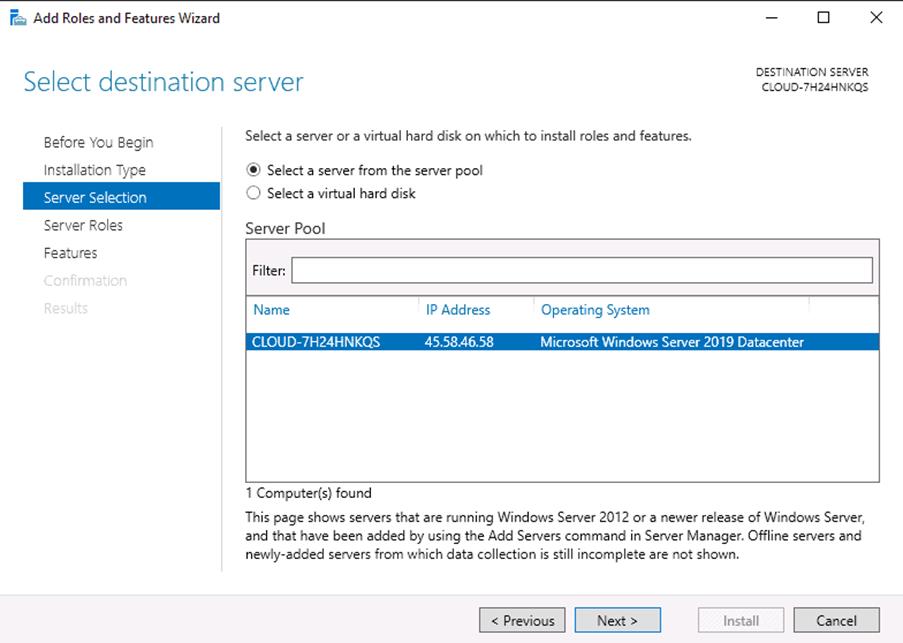
Step 5 – Select “Select a server from the server pool” and click on the Next button. Next, you will be asked to select server roles as shown below:

Step 6 – Select Active Directory Domain Services and click on the Next button. You will be asked to select features as shown below:

Step 7 – Leave all default settings and click on the Next button. Next, you should see the confirm installations selections page.

Step 8 – Click on the Install button to start the installation. Once the installation has been finished. You should see the following page.
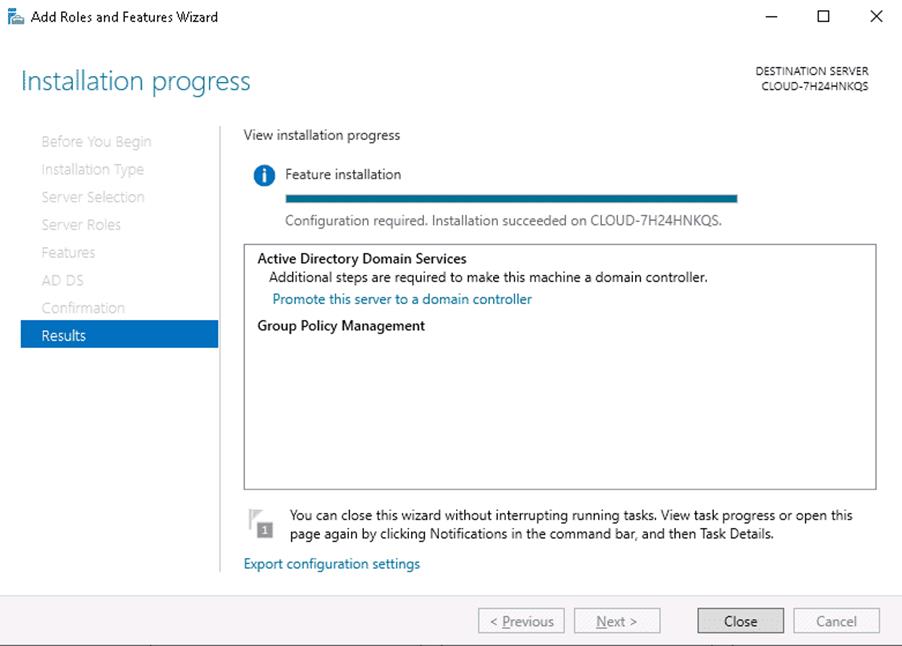
Step 9 – Click on the Close button. You should see the following page.

Step 10– Click on the yellow notification icon. You should see the following page:

Step 11 – Click on Promote this server to a domain controller. You should see the deployment configuration page:

Step 12 – Select add a new forest, define your domain name and click on the Next button. You should see the domain controller options page:

Step 13 – Define your directory service restore mode password and click on the Next button. You should see the DNS options page:

Step 14 – Leave the default configuration and click on the Next button. You will be asked to set a NetBIOS name as shown below:
Step 15 – Set your NetBIOS name and click on the Next button. You will be asked to define AD DS database path location:

Step 16 – Leave the default path as it is and click on the Next button. You should see the review all options page:

Step 17 – Review all the configurations and click on the Next button. You should see the prerequisites check page:

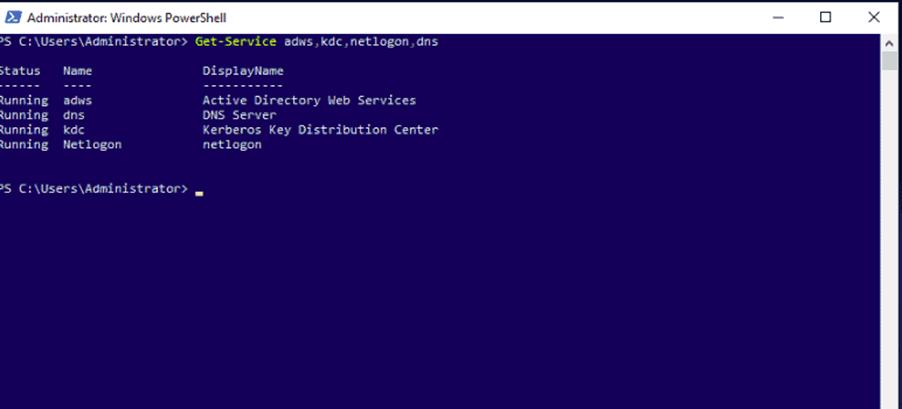
Verify Domain Controller –
To confirm the successful installation of the services, run the following command on Windows PowerShell.
Get-Service adws,kdc,netlogon,dns
You should see the status of all services on the following screen:
Get-ADDomain mydomain.com
Windows Services-
To open the Windows Services Manager on your Windows 11 or Windows 10 computer, do the following:
- Right-click on the Start button to open the WinX Menu
- Select Run
- Type services.msc in the Run box which opens
- Windows Services Manager will open.

Start, Stop, Disable Windows Services-
To start, stop, pause, resume or restart any Windows Service, select the Service and right-click on it. You will be offered these options.
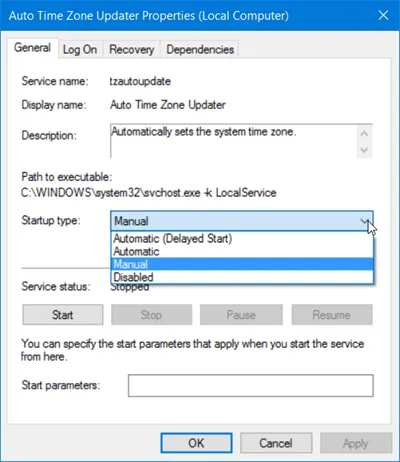
If you wish to manage more options, double-click on the Service to open its Properties box.
Manage Windows Services using Command Line-
You can also use the Command Prompt to start, stop, pause, resume service. To use it, from the WinX Menu, open Command Prompt (Admin) and execute one of the following commands:
To start a service:
net startservice
To stop a service:
net stopservice
To pause a service:
net pauseservice
To resume a service:
net continueservice
To disable a service:
sc config “Name Of Service” start= disabled
===========================================================================
IIS-
The term “IIS” stands for Internet Information Services, which is a general-purpose webserver that runs on the Windows operating system.
Install IIS-
- Open Server Manager, this can be found in the start menu. If it’s not there simply type “Server Manager” with the start menu open and it should be found in the search.

2. Click the “Add roles and features” text.

3. On the “Before you begin” window, simply click the Next button.

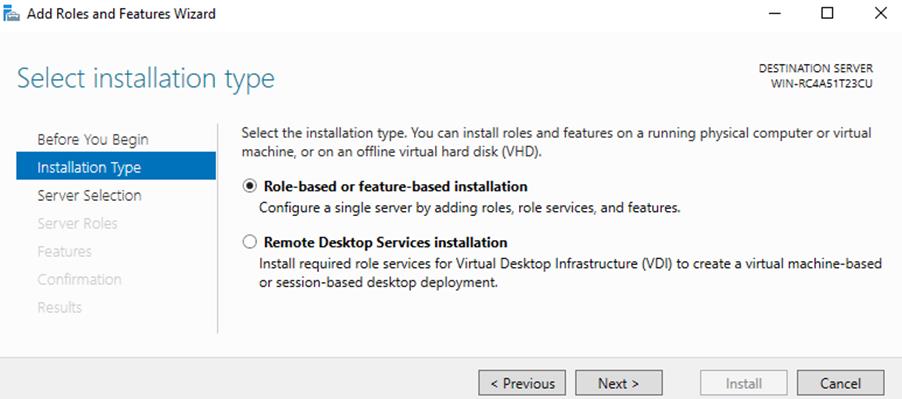
4. On the “Select installation type” window, leave “Role-based or feature-based installation” selected and click Next.
5. As we’re installing to our local machine, leave “Select a server from the server pool” with the current machine selected and click Next. Alternatively you can select another server that you are managing from here, or a VHD.

6. From the “Select server roles” window, check the box next to “Web Server (IIS)”. Doing this may open up a new window advising that additional features are required, simply click the “Add Features” button to install these as well. Click Next back on the Select server roles menu once this is complete.

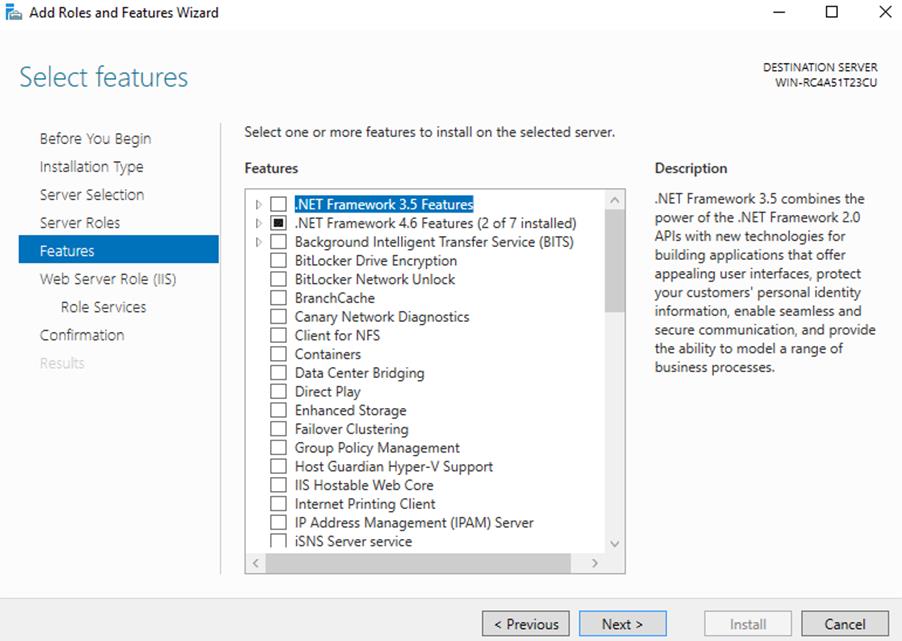
7. We will not be installing any additional features at this stage, so simply click Next on the “Select features” window.
8. Click Next on the “Web Server Role (IIS)” window after reading the information provided.

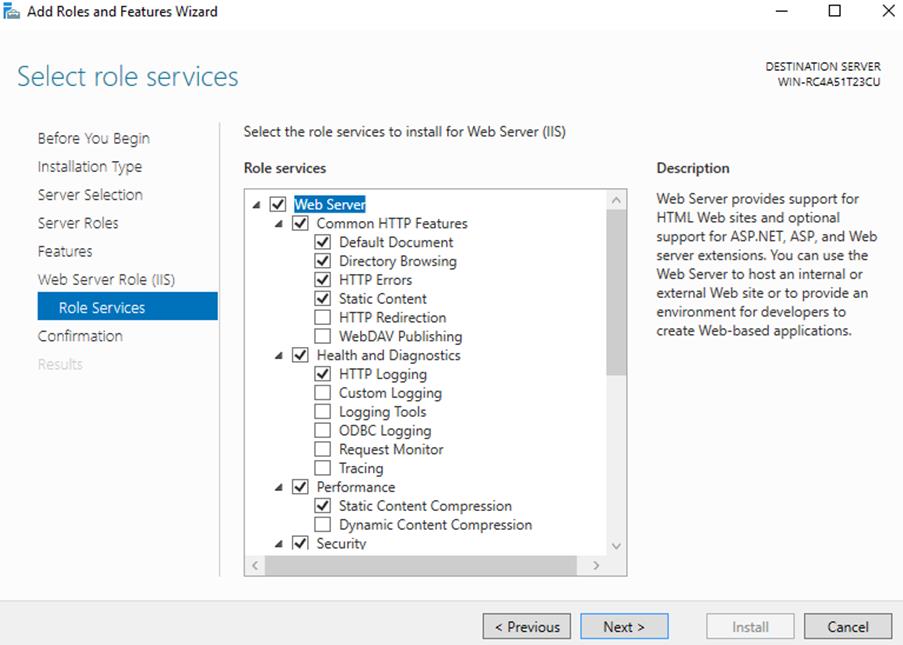
9. At this point on the “Select role services” window you can install additional services for IIS if required. You don’t have to worry about this now as you can always come back and add more later, so just click Next for now to install the defaults.
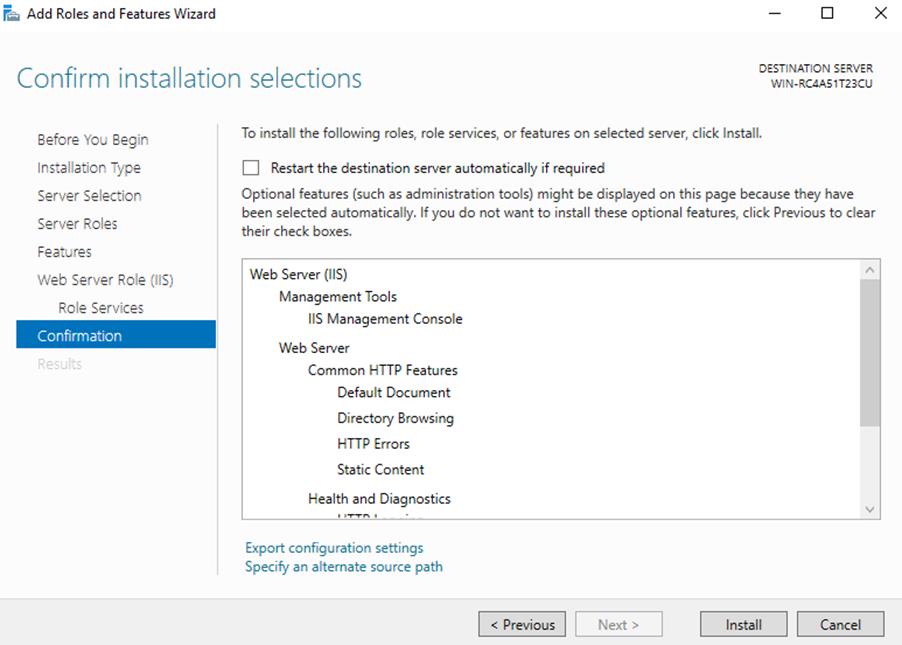
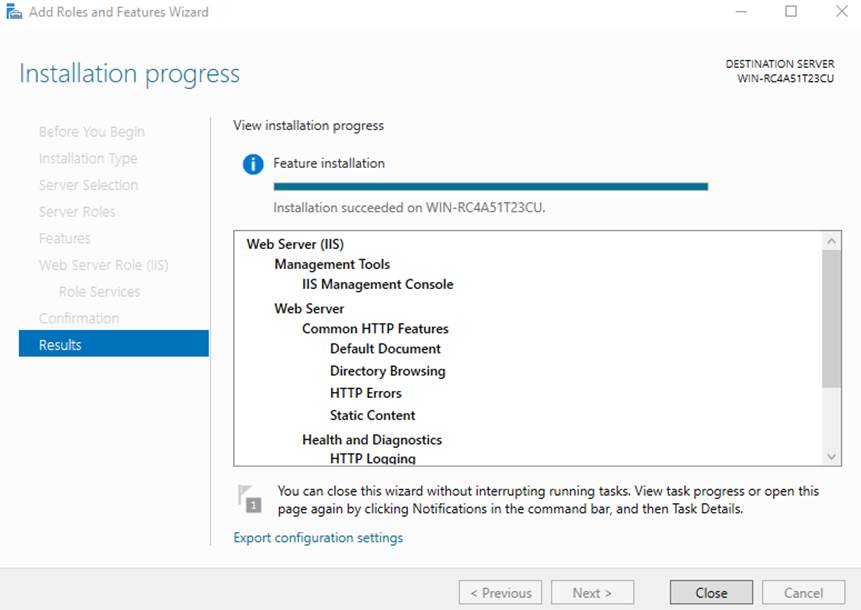
10. Finally on the “Confirm installation selections” window , review the items that are to be installed and click Install when you’re ready to proceed with installing the IIS web server.
11. Once the installation has succeeded, click the close button. At this point IIS should be running on port 80 by default with the firewall rule “World Wide Web Services (HTTP Traffic-In)” enabled in Windows firewall automatically.
12. We can perform a simple test by opening up a web browser and browsing to the server that we have installed IIS on. You should see the default IIS page.

